Remove Write Protection From USB Drive Problem and Complete Solution
If you are using Windows 7 OS and can't find the way to disable the write-protection to your USB drive here is the full tutorial
בינוני 3,791 צפיות
מה תצטרך
- USB
- שגיאה
- Windows
- זכרון
- מחשבים
טיפים
המדריך היה בחלקים באינטרנט בכמה אתרים מפוזר ובחלקים, איחדתי אותו לאחד מובן ומכיל הרבה מקרים ותגובות. הרבה יותר אינפורמציה על עוד דברים שימושיים רבים ניתן למצוא בבלוג שלי באתר: shareinfoblog.blogspot.com
אזהרה
אם אינכם יודעים\בטוחים במה שאתם עושים ועלולים לעשות נזק למחשב עליו אתם מבצעים מדריך זה, היווצעו עם מומחים בעניין. במידה ואת\אתה עושה בדיוק מה שכתוב לא צריכות להיות בעיות אלא אם סטיתם מההוראות.
שלבים
- 1
שלב 1
 After connecting the USB drive, you probably received the error on the left.
 - 2
שלב 2
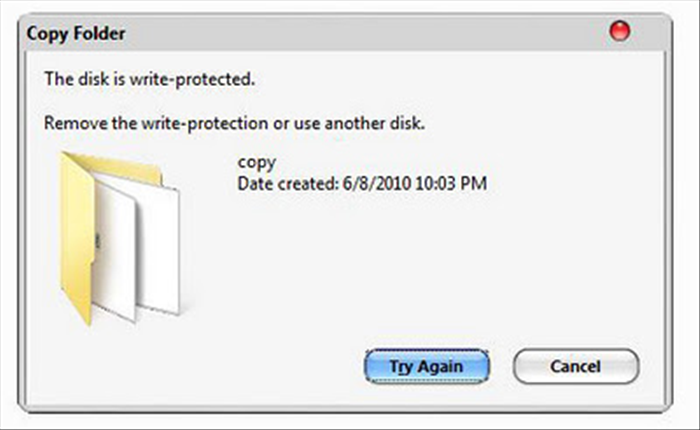 The problem: The disk is write-protected.
 -
- 3
שלב 3
Solutions: 1. Check your cables, is the drive connected properly? In some cases, the problem can be fixed quickly. Just check the cables first and you may notice that the drive was not connected properly. Once it is connected properly, you will be able to write to your USB drive again. Note: In some cases you can read the drive even if it is not connected properly. - 4
שלב 4
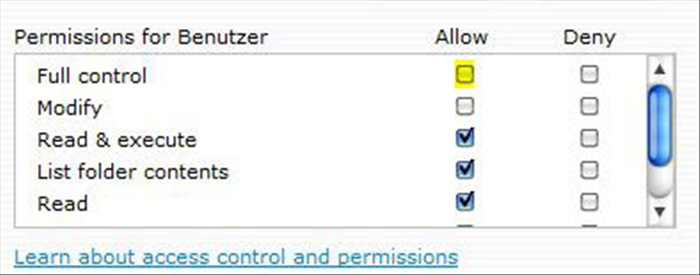 Is the drive actually write-protected? Open the Windows Explorer (Windows key +E) and right-click on your USB drive and click on Properties. Go to the tab Security and click on Edit. Select your username and check if you have Write permissions. If you don’t, check the option “Full” for full permissions or “Write” for write permissions (left picture).
 - 5
שלב 5
Search for a “lock switch” Some USB drives and USB sticks have a switch that allows you to lock a hard drive and prevent ANY changes. Please read your handbook or examine the USB drive, SD card or USB stick closely. If you can find the switch, you can easily unlock and remove the write protection from your drive. - 6
שלב 6
Modify a registry key: StorageDevicePolicies The last solution that you might want to try after creating a backup of your registry: 1. Click Start, type regedit.exe and hit ENTER. 2. Go to the following registry key: HKEY_LOCAL_MACHINE\SYSTEM\CurrrentControlSet\Control\StorageDevicePolicies 3. Search for a key WriteProtect 4. If there is such a key change the value to 0. 5. Repeat the same for all HKEY_LOCAL_MACHINE\SYSTEM\ControlSet00*\Control\StorageDevicePolicies (replace * with number) - 7
שלב 7
Can’t find (6)? Create a registry key StorageDevicePolicies: If you can’t find the key StorageDevicePolicies in step (3) you have to create it manually: 1. Right-click HKEY_LOCAL_MACHINE\SYSTEM\CurrrentControlSet\Control\ and select New -> Key. 2. Enter the name StorageDevicePolicies. 3. Click on the new registry key StorageDevicePolicies and on the right pan right-click, select New > DWORD and give it the name WriteProtect. 4. Double click on it and set its value to 0. - 8
שלב 8
Last resort: Format your USB drive If you still receive the error that you have to remove write protection first, try to connect the USB drive to another PC and see if the problem remains. As a last resort, you might want to copy the data on your drive or stick to another USB drive and then format the write-protected drive. After formatting the USB drive the write protection will be gone.